
What does “Macro Code” mean?
- A macro in Excel is a piece of code that automates tasks in Excel. In simpler terms, it’s like a set of instructions the computer can follow to perform repetitive tasks, saving your time and effort. In Excel, macros are written in VBA (Visual Basic for Applications), a programming language designed for automating tasks within Microsoft Office applications.
- Instead of picking the range > File Tab > Print > Print Select > OK Button, you might use a code to print just a certain range of cells with a single click.
What is VBA, VB, VBA in Excel?
- VBA (Visual Basic for Applications): VBA (Visual Basics for Application) in Excel is the programming language used to create macros in Excel. It is a subset of the Visual Basic (VB) programming language and is integrated into Microsoft Office applications. With VBA, you can interact with Excel’s objects, such as worksheets, ranges, charts, and pivot tables, to automate processes and add custom functionalities to your workbooks.
- VB (Visual Basic): VB in Excel is a general-purpose programming language, and it is used to create standalone applications that can run independently on a computer. Unlike VBA, VB is not integrated into Microsoft Office applications nor designed for automation within Excel or other Office programs.
- VBS (Visual Basic Script): VBS in Excel is a variant of the Visual Basic programming language, but it is specifically designed for internet applications and can be used for client-side scripting within web pages. VBS files have the extension “.vbs” and can be executed on Windows machines without needing a compiler.
Why need Macros in Excel?
- Save Time: One of the main reasons for using macros in Excel is to save time. With macros, you can automate repetitive tasks, reducing the need for manual intervention. Tasks that usually take minutes or even hours to complete can be accomplished in a matter of seconds with the help of a well-written macro.
- Repetitive Tasks: Many tasks in Excel involve performing the same actions repeatedly on different datasets. Macros in Excel can be used to standardize and automate these processes, ensuring consistency and accuracy in data manipulation.
- Develop New Formulas: Macros provide the flexibility to create custom functions and formulas that may not be available in Excel by default. You can build complex calculations tailored to your specific needs, empowering you to solve unique problems efficiently.
- Complex Tasks: Excel macros are excellent for handling complex tasks involving multiple steps and interactions between worksheets or workbooks. By splitting complex tasks into smaller, manageable pieces, macros can simplify otherwise daunting processes.
How do I Utilise an Excel macro code?
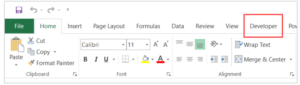
- Enable the Developer Tab: Before using macros, you need to make sure the Developer tab is visible on your Excel ribbon. To enable, go to “File” > “Options” > “Customize Ribbon.” In the right column, check the box next to “Developer” and click “OK.”
- Open the Visual Basic for Applications (VBA) Editor: Once the Developer tab is visible, click on it, and then click on “Visual Basic” to open the VBA Editor. Alternatively, you can also use the shortcut “ALT + F11” to access the VBA Editor.
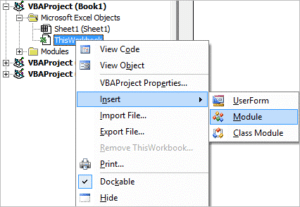
- Create a New Macro: In the VBA Editor, click on “Insert” in the menu and choose “Module.” It will create a new module where you can write your macro code.
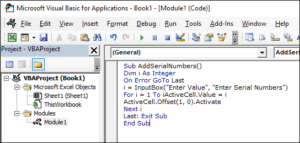
4. Write the Macro Code: Now, you can start writing your macro code in the empty module. The code should be written in VBA. If you are new to VBA, don’t worry; it follows a straightforward syntax.
- Save the Macro: After writing the macro code, close the VBA Editor and save your workbook as a macro-enabled workbook with the extension “.xlsm.” This file format allows macros to be saved within the workbook.
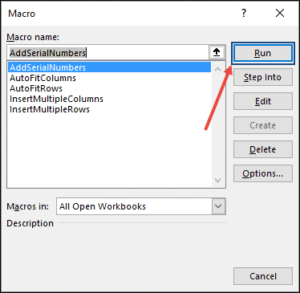
- Run the Macro: To run the macro, go back to the worksheet where you want the macro to take effect. Press “ALT + F8” to open the “Macro” dialog box. Select the macro you created and click “Run.”
- Assign a Shortcut (Optional): If you plan to use the macro frequently, you can assign a keyboard shortcut for quick access. To do this, go back to the VBA Editor, select the macro from the left pane, and click on “Tools” > “Macro” > “Options.” Here, you can assign a shortcut key.
Best practices for writing Excel macros code:
When writing Excel macros code, it’s essential to follow best practices to ensure that the code is efficient, maintainable, and error-free:
- Use Explicit Variable Declaration: Always declare your variables explicitly using the “Dim” statement. This helps prevent variable scope issues and enhances code readability.
- Avoid Select and Activate: Refrain from using the “Select” and “Activate” methods as much as possible. Instead, work directly with objects and ranges in VBA without selecting them first. This speeds up the code execution and reduces the risk of errors.
- Error Handling: Implement error-handling routines to deal with unexpected situations gracefully. Use “On Error” statements to catch and manage errors appropriately.
- Optimize Loops and Code: If your macro involves loops or extensive calculations, optimize the code to run efficiently. For instance, consider turning off screen updating and calculation during the macro execution.
- Comment Your Code: Add comments to your code to explain the purpose of each section and any complex logic. This will help you and other users understand the code better when reviewing or modifying it later.
- Test Thoroughly: Before deploying your macro, test it thoroughly on sample data to ensure it performs as expected and doesn’t produce any errors.
- Backup Your Work: Always make a backup copy of your workbook before running a new macro, especially if the macro performs significant changes to the data. By adhering to these best practices, you can create macros that are robust, reliable, and easy to maintain over time.
How to Documenting Macro Code in Excel:
- Good code documentation is crucial for understanding and maintaining your macros.
- Use comments (indicated by a single quote ‘) to explain the purpose of your code.
- Add a header comment with the macro’s name, author, date, and a brief description.
- Describe the logic behind complex sections of your code.
How to Testing and Debugging Macro Code in Excel:
- Always test your macros on sample data to ensure they work as intended.
- Use breakpoints and debugging tools in the VBA editor to identify and fix errors.
- Print statements can be helpful for tracking variable values during execution.
Everything You Need to Know About VBA Excel With Examples:
- You will become familiar with the terms used frequently in Excel VBA.
- Understanding each of these terms is crucial because they will all be utilized in subsequent modules.
What is VBA Module and How to Use VBA Module:
- The place where the code is written is in modules. There are no Modules because this is a brand-new Workbook.
- Navigate to Insert -> Module to insert a module. ‘module1’ is formed once a module is inserted.
- We can write VBA code inside the modules, and the code is written inside a Procedure. A procedure or subroutine is a collection of VBA statements that tells the programmed what to do.
What is the VBA Procedure in Excel
- Procedures are collections of statements that Excel is told to execute collectively in order to carry out a certain task. The activity completed may be relatively straightforward or extremely challenging.
- However, it is a good idea to divide difficult processes into simpler ones.
- The two primary categories of Procedures are Function and Sub.
What Is VBA Function in Excel
- Anywhere in your application, you can invoke a function, which is a collection of reusable code. This avoids the need to repeatedly write the same code. This aids programmers in breaking down a large programme into several small, manageable functions.
- VBA allows users to create custom functions in addition to built-in ones, and statements are placed between Function and End Function.
How to Execute VBA Sub-procedures in Excel
- Functions and sub-procedures function similarly. Functions may or may not return a value, but sub procedures DO NOT. It IS POSSIBLE to call sub-procedures without the call keyword.
- Sub and End Sub statements are required to surround sub processes.
VBA Variable Types in Excel:
- In VBA, a variable serves as a named memory location that allows for the storage of data that may change during the script’s execution. To adhere to the correct naming conventions for variables, it is essential to follow these fundamental guidelines:
- The VBA variable in Excel must always begin with a letter.
- Avoid using special characters such as spaces, periods, and exclamation points, as well as symbols like @, &, $, or # in the variable’s name.
- Ensure that the length of the VBA variable’s name does not exceed 255 characters.
- It is crucial to refrain from using reserved keywords specific to Visual Basic as variable names.
- Syntax:
- Syntax in VBA, you need to declare the variables before using them.
- Dim <variable_name> As <variable_type>>
VBA Data Types in Excel
- Numerous VBA data types can be categorised into two basic groups: numeric data types and non-numeric data types.
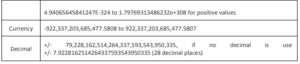
- Types of Numeric Data
- The numeric VBA data types and the permitted range of values are shown in the following table.

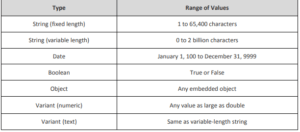
Non-Numeric VBA Data Types:
Followings are non-numeric data types
Constant VBA in Excel
- In VBA, a constant serves as a named memory location that stores a fixed value, maintaining its unchangeable nature throughout the script’s execution. Unlike variables, constants retain their assigned value and cannot be altered during the program’s runtime. Any attempt to modify a constant’s value results in an error, leading to the termination of the script’s execution. To declare a constant, the same syntax used for variables is employed.
- To ensure adherence to the naming conventions for constants, consider the following guidelines:
- The constant’s name must commence with a letter.
- Special characters, including spaces, periods (.), exclamation marks (!), as well as @, &, $, #, are strictly prohibited in the constant’s name.
- The length of the constant’s name should not exceed 255 characters.
- To prevent conflicts with language-specific commands, it is crucial to avoid utilizing reserved keywords in Visual Basic as constant names.
List Of Excel VBA Operators With Example
A straightforward formula can be used to define an operator: 4 + 5 equals 9. In this case, the operands are 4 and 5, and the operator is +. The following operator types are supported by VBA:
- Arithmetic Operators
- Comparison Operators
- Logical (or Relational) Operators
- Concatenation Operators
How to Use Input-Box Function in VBA Excel
- The InputBox function in VBA is a powerful tool that allows developers to interact with users through a dialog box to receive input. This feature enables users to provide information that can be utilized in various scenarios within the VBA code. The InputBox function is highly customizable and offers several parameters to modify its behavior and appearance.
- Syntax:
- InputBox(Prompt, [Title], [Default], [XPos], [YPos], [HelpFile], [Context])
- Parameters:
- Prompt: This is a mandatory parameter representing the message displayed in the input box. It provides guidance to the user regarding the expected input. The prompt can be up to 1024 characters long and can span multiple lines using the carriage return character (Chr(13)) or linefeed character (Chr(10)).
- Title (Optional): You can optionally specify a custom title for the input box dialog. If left empty, the default title will display the application’s name. The title should be a string expression.
- Default (Optional): This parameter allows you to suggest a default value that appears in the input box, providing a user-friendly hint about the expected input format. The default can be a string expression.
- XPos (Optional): Represents the horizontal position of the input box relative to the left side of the screen. If not specified, the input box will be horizontally centered. XPos is a numeric expression.
- YPos (Optional): Indicates the vertical position of the input box relative to the top of the screen. If not specified, the input box will be vertically centered. YPos is also a numeric expression.
- HelpFile (Optional): If you have context-sensitive help related to the input box, you can provide the HelpFile parameter, specifying the help file to be used. HelpFile should be a string expression.
- Context (Optional): When providing the HelpFile parameter, you can also specify the Context parameter, which represents the help context number relevant to the specific input box. Context is a numeric expression.
Example of Input-Box Function in VBA:
Function findArea()
Dim Length As Double
Dim Width As Double
Length = InputBox(“Enter Length “, “Enter a Number”)
Width = InputBox(“Enter Width”, “Enter a Number”)
findArea = Length * Width
End Function
How to record Macros in excel?
Discover how to create an Excel macro.
- Let’s create a very basic macro that simply picks a cell and enters the word “Excel” there. While recording this macro, I am using the text “Excel,” but feel free to substitute your name or any other text you choose.
- The steps to record this macro are as follows:
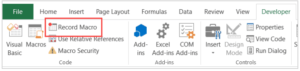
- On the Developer tab, click.
- Select the Macro button in the Code group. The ‘Record Macro’ dialogue box will then be displayed. the ribbon’s Developer tab’s Record Macro button
- Give your macro a name in the Record Macro dialogue box. EnterText is the name I’m using. When naming a macro, there are a few rules that you must abide by. You cannot, for instance: you can not use spaces in between. I usually prefer to keep my macro names as a single word, with different parts with a capitalized first alphabet. You can also use underscore to separate two words – such as Enter_Text.
Simple Code: Create message box with message learn excel
Sub first_code()
MsgBox “Excel learn”
MsgBox 100
End Sub
-
Autofit Columns and Rows:
- This macro will automatically adjust the width of all columns and the height of all rows in the active worksheet to fit the content.
VBA Code:
Sub AutofitColumnsAndRows()
ActiveSheet.Cells.EntireColumn.AutoFit
ActiveSheet.Cells.EntireRow.AutoFit
End Sub
Step-by-step:
- Press ALT + F11 to open the VBA editor.
- Click Insert > Module to add a new module.
- Copy and paste the code into the module.
- Close the VBA editor.
- Press ALT + F8 to open the macro dialog box.
- Select the “AutofitColumnsAndRows” macro from the list and click “Run.”
-
Remove Duplicates:
- This macro will remove duplicate values from the selected range in the active worksheet.
VBA code to remove duplicates:
Sub RemoveDuplicates()
On Error Resume Next
Selection.RemoveDuplicates Columns:=Array(1), Header:=xlNo
On Error GoTo 0
End Sub
Step-by-step:
- Open the VBA editor and add a new module.
- Copy and paste the code into the module.
- Close the VBA editor.
- Select the range containing the data from which you want to remove duplicates.
- Press ALT + F8 to open the macro dialog box.
- Select the “RemoveDuplicates” macro from the list and click “Run.”
-
Copy Data to Another Sheet
- Task: Copy data from one sheet to another in the same workbook.
- Open Microsoft Excel and press “Alt + F11” to open the VBA editor.
- Click “Insert” in the menu and select “Module” to add a new module.
Write the following VBA code:
Sub CopyData()
Dim wsSource As Worksheet
Dim wsTarget As Worksheet
Dim sourceRange As Range
Dim targetRange As Range
‘ Set the source worksheet
Set wsSource = ThisWorkbook.Worksheets(“SourceSheet”) ‘ Replace “SourceSheet” with the actual sheet name
‘ Set the target worksheet
Set wsTarget = ThisWorkbook.Worksheets(“TargetSheet”) ‘ Replace “TargetSheet” with the actual sheet name
‘ Set the source range (data to copy)
Set sourceRange = wsSource.Range(“A1:B10”) ‘ Replace “A1:B10” with the desired range
‘ Set the target range (destination for the copied data)
Set targetRange = wsTarget.Range(“A1”) ‘ Replace “A1” with the starting cell in the target sheet
‘ Copy the data
sourceRange.Copy
targetRange.PasteSpecial xlPasteValues ‘ Paste only values
Application.CutCopyMode = False ‘ Clear the clipboard
End Sub
Step by step:
- Close the VBA editor and go back to the Excel worksheet.
- Press “Alt + F8” to open the “Macro” dialog box.
- Select “CopyData” from the list and click “Run” to execute the macro.
- The macro will copy the data from “SourceSheet” to “TargetSheet” based on the specified range.
-
Find and Replace
- Task: Find specific text in a worksheet and replace it with new text.
- Open Microsoft Excel and press “Alt + F11” to open the VBA editor.
- Click “Insert” in the menu and select “Module” to add a new module.
Write the following VBA code:
Sub FindAndReplace()
Dim ws As Worksheet
Dim findText As String
Dim replaceText As String
‘ Set the worksheet to search for text
Set ws = ThisWorkbook.Worksheets(“Sheet1”) ‘ Replace “Sheet1” with the actual sheet name
‘ Set the text to find and replace
findText = “old_text” ‘ Replace “old_text” with the text you want to find
replaceText = “new_text” ‘ Replace “new_text” with the text you want to replace with
‘ Perform find and replace
ws.Cells.Replace What:=findText, Replacement:=replaceText, LookAt:=xlPart, MatchCase:=False
End Sub
Step by step:
- Close the VBA editor and go back to the Excel worksheet.
- Press “Alt + F8” to open the “Macro” dialog box.
- Select “FindAndReplace” from the list and click “Run” to execute the macro.
- The macro will find all occurrences of “old_text” in “Sheet1” and replace them with “new_text.”
-
Sort Data as per criteria:
Task: Sort data as per criteria.
- Open Microsoft Excel and press “Alt + F11” to open the VBA editor.
- Click “Insert” in the menu and select “Module” to add a new module.
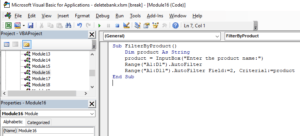
Sub FilterByProduct()
Dim product As String
product = InputBox(“Enter the product name:”)
Range(“A1:D1”).AutoFilter
Range(“A1:D11”).AutoFilter Field:=2, Criteria1:=product
End Sub
Step by step:
- Close the VBA editor and go back to the Excel worksheet.
- Press “Alt + F8” to open the “Macro” dialog box.
- Select ” FilterByProduct ” from the list and click “Run” to execute the macro.
- The macro will sort data as per product criteria.
Sample data:
|
Employee ID |
Name | Department |
Salary |
|
101 |
John Doe | HR |
45000 |
|
102 |
Jane Smith | IT |
55000 |
|
103 |
Bob Brown | HR |
40000 |
|
104 |
Alice Lee | Finance |
60000 |
|
105 |
Mike Chen | IT |
50000 |
-
Summarize Data and Create a Pivot Table:
Summarize sales data and create a pivot table.
Write this Code:
Sub SummarizeDataAndCreatePivotTable()
Dim ws As Worksheet
Set ws = ThisWorkbook.Worksheets(“Sheet1”) ‘ Change “Sheet1” to your dataset sheet name
‘ Create a pivot cache and pivot table
Dim pivotCache As PivotCache
Dim pivotTable As PivotTable
Set pivotCache = ThisWorkbook.PivotCaches.Create(SourceType:=xlDatabase, SourceData:=ws.UsedRange)
Set pivotTable = pivotCache.CreatePivotTable(TableDestination:=ws.Cells(10, 5), TableName:=”SalesPivotTable”)
‘ Add fields to the pivot table
pivotTable.AddFields RowFields:=”Date”, ColumnFields:=”Product”
pivotTable.AddDataField pivotTable.PivotFields(“Quantity”), “Total Quantity”, xlSum
pivotTable.AddDataField pivotTable.PivotFields(“Price”), “Total Sales”, xlSum
End Sub
How to Use:
- Make sure that the source data is in “Sheet1,” starting from cell A1 (as shown in the sample dataset).
- Run the “SummarizeDataAndCreatePivotTable” macro by pressing Alt + F8, selecting the macro, and clicking “Run.”
- The macro will summarize the sales data and create a pivot table in “Sheet1.”
-
Macro to Filter Data Based on Criteria:
Filter the data based on specific criteria.
Sub FilterData()
Dim ws As Worksheet
Set ws = ThisWorkbook.Worksheets(“Sheet1”) ‘ Change “Sheet1” to your dataset sheet name
‘ Apply AutoFilter and filter data based on Department “HR”
ws.Range(“A1:D1″).AutoFilter Field:=3, Criteria1:=”HR”
End Sub
How to Use:
- Make sure that the source data is in “Sheet1,” starting from cell A1 (as shown in the sample dataset).
- Run the “FilterData” macro by pressing Alt + F8, selecting the macro, and clicking “Run.”
- The macro will apply an AutoFilter to the data in “Sheet1” and filter the data to show only employees from the HR department.
-
Macro to Copy Filtered Data to Another Sheet:
Filter data based on a specific criteria and copy the filtered data to another sheet.
Sub CopyFilteredData()
Dim ws As Worksheet
Set ws = ThisWorkbook.Worksheets(“Sheet1”) ‘ Change “Sheet1” to your dataset sheet name
‘ Apply AutoFilter and filter data based on Department “HR”
ws.Range(“A1:D1″).AutoFilter Field:=3, Criteria1:=”HR”
‘ Copy filtered data to a new sheet
Dim filteredData As Range
On Error Resume Next
Set filteredData = ws.AutoFilter.Range.Offset(1).SpecialCells(xlCellTypeVisible)
On Error GoTo 0
If Not filteredData Is Nothing Then
Dim newWs As Worksheet
On Error Resume Next
Set newWs = ThisWorkbook.Worksheets(“FilteredData”)
On Error GoTo 0
If newWs Is Nothing Then
Set newWs = ThisWorkbook.Sheets.Add(After:=ws)
newWs.Name = “FilteredData”
End If
ws.AutoFilter.Range.Copy newWs.Range(“A1”)
End If
ws.AutoFilterMode = False
End Sub
How to Use:
- Make sure that the source data is in “Sheet1,” starting from cell A1 (as shown in the sample dataset).
- Run the “CopyFilteredData” macro by pressing Alt + F8, selecting the macro, and clicking “Run.”
- The macro will apply an AutoFilter to the data in “Sheet1,” filter the data to show only employees from the HR department, and then copy the filtered data to a new sheet named “FilteredData.”
-
Macro to Create a Pivot Table:
Create pivot table
Sub CreatePivotTable()
‘ Step 1: Define worksheet
Dim ws As Worksheet
Set ws = ThisWorkbook.Worksheets(“DataSheet”)
‘ Step 2: Define the pivot cache and pivot table
Dim pvtCache As PivotCache
Set pvtCache = ThisWorkbook.PivotCaches.Create(SourceType:=xlDatabase, SourceData:=ws.Range(“A1:C5”))
Dim pvtTable As PivotTable
Set pvtTable = pvtCache.CreatePivotTable(TableDestination:=ws.Range(“E1″), TableName:=”PivotTable1”)
‘ Step 3: Add fields to the pivot table
pvtTable.AddFields RowFields:=”Fruit”, ColumnFields:=”Month”, DataField:=”Sales”, Function:=xlSum
End Sub
How to use:
- Press ALT + F11 to open the VBA editor.
- Click Insert > Module to add a new module.
- Copy and paste the code into the module.
- Close the VBA editor.
- Press ALT + F8 to open the macro dialog box.
- Select the ” createpivottable ” macro from the list and click “Run.”
-
Insert Multiple Column:
Insert multiple column at same time as per your requirement.
Sub InsertMultipleColumns()
Dim i As Integer
Dim j As Integer
ActiveCell.EntireColumn.Select
On Error GoTo Last
i = InputBox(“Enter number of columns to insert”, “Insert Columns”)
For j = 1 To i
Selection.Insert Shift:=xlToRight, CopyOrigin:=xlFormatFromRightorAbove
Next j
Last: Exit Sub
End Sub
- Press ALT + F11 to open the VBA editor.
- Click Insert > Module to add a new module.
- Copy and paste the code into the module.
- Close the VBA editor.
- Press ALT + F8 to open the macro dialog box.
- Select the ” InsertMultipleColumns ” macro from the list and click “Run.”
-
Macro to Calculate Age from Date of Birth:
Calculate age based on the date of birth in the dataset.
Sub CalculateAge()
Dim ws As Worksheet
Set ws = ThisWorkbook.Worksheets(“calculate_age”) ‘ Change “Sheet1” to your dataset sheet name
Dim lastRow As Long
lastRow = ws.Cells(ws.Rows.Count, “A”).End(xlUp).Row
Dim birthDate As Date, currentDate As Date, age As Long
Dim ageColumn As Long
ageColumn = ws.Cells(1, ws.Columns.Count).End(xlToLeft).Column + 1 ‘ Calculate the next available column
ws.Cells(1, ageColumn).Value = “Age” ‘ Header for the Age column
For i = 2 To lastRow
birthDate = ws.Cells(i, 3).Value ‘ Assuming Date of Birth is in column C (3)
currentDate = Date
age = DateDiff(“yyyy”, birthDate, currentDate)
ws.Cells(i, ageColumn).Value = age
Next i
End Sub
How to use:
- Press ALT + F11 to open the VBA editor.
- Click Insert > Module to add a new module.
- Copy and paste the code into the module.
- Close the VBA editor.
- Press ALT + F8 to open the macro dialog box.
- Select the ” CalculateAge ” macro from the list and click “Run.”
-
Apply Conditional Formatting
Apply conditional formatting to highlight specific data based on criteria
Sub ApplyConditionalFormatting()
Dim ws As Worksheet
Set ws = ThisWorkbook.Worksheets(“Sheet1”) ‘ Change “Sheet1” to your dataset sheet name
‘ Define the range containing the data (excluding headers)
Dim lastRow As Long
lastRow = ws.Cells(ws.Rows.Count, “A”).End(xlUp).Row
Dim dataRange As Range
Set dataRange = ws.Range(“A2:D” & lastRow)
‘ Apply conditional formatting to highlight salaries > 50000 in red
dataRange.FormatConditions.Add Type:=xlCellValue, Operator:=xlGreater, Formula1:=”50000″
dataRange.FormatConditions(dataRange.FormatConditions.Count).Interior.Color = RGB(255, 0, 0)
End Sub
How to Use:
- Make sure that the source data is in “Sheet1,” starting from cell A1 (as shown in the sample dataset).
- Run the “ApplyConditionalFormatting” macro by pressing Alt + F8, selecting the macro, and clicking “Run.”
- The macro will apply conditional formatting to the “Salary” column and highlight salaries greater than 50000 in red.
-
Macro to Create a Bar Chart
- Create a bar chart to visualize data.
- Sample Dataset:
- Assume the following table represents our sample dataset for product sales data:
|
Product |
Quantity Sold |
|
Product A |
50 |
|
Product B |
30 |
|
Product C |
70 |
|
Product D |
20 |
| Product E |
40 |
Sub CreateBarChart()
Dim ws As Worksheet
Set ws = ThisWorkbook.Worksheets(“Sheet1”) ‘ Change “Sheet1” to your dataset sheet name
‘ Define the range containing the data (excluding headers)
Dim lastRow As Long
lastRow = ws.Cells(ws.Rows.Count, “A”).End(xlUp).Row
Dim dataRange As Range
Set dataRange = ws.Range(“A2:B” & lastRow)
‘ Add a new chart sheet
Dim cht As Chart
Set cht = ThisWorkbook.Charts.Add
cht.Name = “SalesChart”
‘ Create a bar chart
cht.ChartType = xlColumnClustered
cht.SetSourceData Source:=dataRange
cht.Location Where:=xlLocationAsObject, Name:=ws.Name
cht.HasTitle = True
cht.ChartTitle.Text = “Product Sales Chart”
cht.ChartTitle.Font.Bold = True
End Sub
How use:
- Make sure that the source data is in “Sheet1,” starting from cell A1 (as shown in the sample dataset).
- Run the “CreateBarChart” macro by pressing Alt + F8, selecting the macro, and clicking “Run.”
- The macro will create a new chart sheet named “SalesChart” and generate a bar chart to visualize the quantity sold for each product.
-
Macros to data validation:
Sub CreateDataValidationList()
Dim ws As Worksheet
Set ws = ThisWorkbook.Worksheets(“data validation”) ‘ Change “Sheet1” to your dataset sheet name
‘ Define the range for data validation (Product column)
Dim lastRow As Long
lastRow = ws.Cells(ws.Rows.Count, “A”).End(xlUp).Row
Dim dataValidationRange As Range
Set dataValidationRange = ws.Range(“A2:A” & lastRow
‘ Create a data validation list for the Product column
Dim dataValidationList As String
dataValidationList = “Electronics,Clothing,Home Decor,Furniture”
With dataValidationRange.Validation
.Delete
.Add Type:=xlValidateList, AlertStyle:=xlValidAlertStop, Operator:=xlBetween, Formula1:=dataValidationList
.IgnoreBlank = True
.InCellDropdown = True
.InputTitle = “Select Product”
.ErrorTitle = “Invalid Entry”
.InputMessage = “Choose a product from the drop-down list.”
.ErrorMessage = “Please select a valid product.”
.ShowInput = True
.ShowError = True
End With
End Sub
How to use:
- Make sure that the source data is in “Sheet1,” starting from cell A1 (as shown in the sample dataset).
- Run the “CreateDataValidationList” macro by pressing Alt + F8, selecting the macro, and clicking “Run.”
- The macro will create a data validation list for the “Product” column, allowing users to choose from a list of products in the cells.
-
Macro to Generate Random Numbers
Generate random numbers and populate a range with them.
Sub GenerateRandomNumbers()
Dim ws As Worksheet
Set ws = ThisWorkbook.Worksheets(“Sheet1”) ‘ Change “Sheet1” to your worksheet name
‘ Define the range where random numbers will be generated
Dim lastRow As Long
lastRow = ws.Cells(ws.Rows.Count, “A”).End(xlUp).Row
Dim dataRange As Range
Set dataRange = ws.Range(“E2:E” & lastRow)
‘ Generate random numbers between 1 and 100 and populate the range
Dim i As Long
For i = 1 To dataRange.Rows.Count
dataRange.Cells(i, 1).Value = Int((100 – 1 + 1) * Rnd + 1)
Next i
End Sub
How to Use:
- Open your Excel workbook.
- Press Alt + F11 to open the Visual Basic for Applications (VBA) editor.
- In the VBA editor, go to Insert > Module to insert a new module.
- Paste the provided VBA code into the module.
- Close the VBA editor (Alt + Q) to return to Excel.
- In your workbook, go to the sheet where you want to generate random numbers (e.g., “Sheet1”).
- Run the “GenerateRandomNumbers” macro by pressing Alt + F8, selecting the macro, and clicking “Run.”
- The macro will generate random numbers between 1 and 100 in column E, starting from cell E2 (as shown in the code), for the specified range.
-
Macro to Insert Current Date and Time:
This macro inserts the current date and time into the active cell.
Sub InsertDateTime()
ActiveCell.Value = Now
End Sub
-
Macro to Sum Selected Cells:
This macro displays a message box with the sum of the selected cells.
Sub SumSelectedCells()
MsgBox “Selected Cells Sum: ” & Application.Sum(Selection)
End Sub
-
Macro to Find and Replace Text:
This macro prompts the user to enter text to find and its replacement. It then performs a find and replace operation for the entire worksheet.
Sub SumSelectedCells()
MsgBox “Selected Cells Sum: ” & Application.Sum(Selection)
End Sub
-
Macro to Sort Data by Date:
This macro sorts the data by date in ascending order based on the “Date” column.
Sub SortByDate()
Range(“A1:D6”).Sort Key1:=Range(“A2:A6”), Order1:=xlAscending, Header:=xlYes
End Sub
-
Highlight Cells with Misspelled Words:
When you fill hard to find misspelled word then use this code for find.
Sub HighlightMisspelledCells()
Dim rng As Range
For Each rng In ActiveSheet.UsedRange
If Not Application.CheckSpelling(word:=rng.Text) Then
rng.Style = “Bad”
End If
Next rng
End Sub
-
Print Comments:
- To turn on the option to print cell comments at the end of the page, use this macro. If you have 10 pages to print, for example, this code will print all the comments on the 11th and final page. To turn on the option to print cell comments at the end of the page, use this macro. If you have 10 pages to print, for example, this code will print all the comments on the 11th and final page.
Sub printComments()
With ActiveSheet.PageSetup
.printComments = xlPrintSheetEnd
End With
End Sub
-
VBA Macro to Summarize Data
- Macro to summarize the sales data by calculating the total sales amount for each product.
Sample dataset:
|
Date |
Product | Quantity | Price |
|
01-07-2023 |
Product A | 5 |
10.5 |
|
02-07-2023 |
Product B | 3 |
8.75 |
|
02-07-2023 |
Product A | 2 |
10.5 |
| 03-07-2023 | Product C | 4 | 12 |
|
04-07-2023 |
Product A | 6 |
10.5 |
|
05-07-2023 |
Product B | 1 |
8.75 |
|
05-07-2023 |
Product C | 2 |
12 |
|
06-07-2023 |
Product A | 3 |
10.5 |
|
07-07-2023 |
Product B | 7 |
8.75 |
|
07-07-2023 |
Product C | 5 |
12 |
Sub SummarizeSalesData()
Dim ws As Worksheet
Set ws = ThisWorkbook.Worksheets(“Sheet1”) ‘ Change “Sheet1” to your dataset sheet name
Dim lastRow As Long
lastRow = ws.Cells(ws.Rows.Count, “A”).End(xlUp).Row
Dim product As String
Dim salesAmount As Double
Dim summaryWs As Worksheet
On Error Resume Next
Set summaryWs = ThisWorkbook.Worksheets(“Summary”)
On Error GoTo 0
If summaryWs Is Nothing Then
Set summaryWs = ThisWorkbook.Sheets.Add(After:=ws)
summaryWs.Name = “Summary”
End If
Dim summaryRowIndex As Long
summaryRowIndex = 2 ‘ Start summarizing from row 2 in the Summary sheet
summaryWs.Cells(1, 1).Value = “Product”
summaryWs.Cells(1, 2).Value = “Total Sales Amount”
For i = 2 To lastRow
product = ws.Cells(i, 2).Value
salesAmount = salesAmount + (ws.Cells(i, 3).Value * ws.Cells(i, 4).Value)
If i = lastRow Or ws.Cells(i + 1, 2).Value <> product Then
summaryWs.Cells(summaryRowIndex, 1).Value = product
summaryWs.Cells(summaryRowIndex, 2).Value = salesAmount
salesAmount = 0
summaryRowIndex = summaryRowIndex + 1
End If
Next i
End Sub
Steps to Use:
- Open your Excel workbook that contains the sample dataset in “Sheet1.”
- Press Alt + F11 to open the Visual Basic for Applications (VBA) editor.
- In the VBA editor, go to Insert > Module to insert a new module.
- Paste the provided VBA code into the module.
- Close the VBA editor (Alt + Q) to return to Excel.
How to Use:
- Make sure that your dataset is in “Sheet1,” starting from cell A1 (as shown in the example dataset).
- Run the “SummarizeSalesData” macro by pressing Alt + F8, selecting “SummarizeSalesData,” and clicking “Run.”
-
Macro to Copy Filtered Data to Another Sheet:
Filter data based on a specific criteria and copy the filtered data to another sheet.
Sub CopyFilteredData()
Dim ws As Worksheet
Set ws = ThisWorkbook.Worksheets(“Sheet1”) ‘ Change “Sheet1” to your dataset sheet name
‘ Apply AutoFilter and filter data based on Department “HR”
ws.Range(“A1:D1″).AutoFilter Field:=3, Criteria1:=”HR”
‘ Copy filtered data to a new sheet
Dim filteredData As Range
On Error Resume Next
Set filteredData = ws.AutoFilter.Range.Offset(1).SpecialCells(xlCellTypeVisible)
On Error GoTo 0
If Not filteredData Is Nothing Then
Dim newWs As Worksheet
On Error Resume Next
Set newWs = ThisWorkbook.Worksheets(“FilteredData”)
On Error GoTo 0
If newWs Is Nothing Then
Set newWs = ThisWorkbook.Sheets.Add(After:=ws)
newWs.Name = “FilteredData”
End If
ws.AutoFilter.Range.Copy newWs.Range(“A1”)
End If
ws.AutoFilterMode = False
End Sub
-
Macro to Delete Blank Rows:
This code help you to delete all blank from your data.
Sub DeleteBlankRows()
‘ Step 1: Define worksheet
Dim ws As Worksheet
Set ws = ThisWorkbook.Worksheets(“DataSheet”)
‘ Step 2: Delete blank rows
Dim lastRow As Long
lastRow = ws.Cells(ws.Rows.Count, “A”).End(xlUp).Row
Dim i As Long
For i = lastRow To 1 Step -1
If ws.Cells(i, 1).Value = “” Then
ws.Rows(i).Delete
End If
Next i
End Sub
-
Macro to Convert Text to Proper Case:
Convert text in a specified column to proper case.
Sub ConvertToProperCase()
Dim ws As Worksheet
Set ws = ThisWorkbook.Worksheets(“Sheet1”) ‘ Change “Sheet1” to your dataset sheet name
‘ Define the range containing the data (excluding headers)
Dim lastRow As Long
lastRow = ws.Cells(ws.Rows.Count, “A”).End(xlUp).Row
Dim dataRange As Range
Set dataRange = ws.Range(“A2:A” & lastRow)
‘ Convert text to proper case in the range
Dim cell As Range
For Each cell In dataRange
cell.Value = StrConv(cell.Value, vbProperCase)
Next cell
End Sub
-
Protect all Worksheets
If you want to protect all sheets use this code and enter password.
Sub ProtectAllWorskeets()
Dim ws As Worksheet
Dim ps As String
ps = InputBox(“Enter a Password.”, vbOKCancel)
For Each ws In ActiveWorkbook.Worksheets
ws.Protect Password:=ps
Next ws
End Sub
-
Resize All Charts in a Worksheet:
IF you want to resize or all chart in same size use this code with changing of height and width.
Sub Resize_Charts()
Dim i As Integer
For i = 1 To ActiveSheet.ChartObjects.Count
With ActiveSheet.ChartObjects(i)
.Width = 300
.Height = 200
End With
Next i
End Sub
-
Macros to Export excel data into CSV:
Export data to a CSV file.
Sample data:
|
Product |
Quantity Sold |
|
Product A |
50 |
|
Product B |
30 |
|
Product C |
70 |
|
Product D |
20 |
|
Product E |
40 |
Sub ExportToCSV()
Dim ws As Worksheet
Set ws = ThisWorkbook.Worksheets(“export csv”) ‘ Change “Sheet1” to your dataset sheet name
‘ Define the range containing the data (including headers)
Dim lastRow As Long
lastRow = ws.Cells(ws.Rows.Count, “A”).End(xlUp).Row
Dim dataRange As Range
Set dataRange = ws.Range(“A1:B” & lastRow)
‘ Get the CSV file path
Dim csvFilePath As String
csvFilePath = “E:\Excel Macros-VBA\ExportedFile.csv” ‘ Change to the desired CSV file path and name
‘ Export data to the CSV file
Dim dataArray As Variant
dataArray = dataRange.Value
Dim csvData() As String
ReDim csvData(1 To UBound(dataArray, 1))
Dim i As Long
For i = 1 To UBound(dataArray, 1)
csvData(i) = Join(Application.Index(dataArray, i, 0), “,”)
Next i
Open csvFilePath For Output As #1
For i = 1 To UBound(csvData)
Write #1, csvData(i)
Next i
Close #1
End Sub
-
Macro to Create a Sales Data Validation Drop-Down:
- This macro creates a new worksheet named “SalesDataValidation” and sets up data validation on the “Product” column with a drop-down list containing the product names.
Sub CreateSalesDataValidation()
Dim ws As Worksheet
Set ws = ThisWorkbook.Sheets.Add
ws.Name = “SalesDataValidation”
ws.Range(“A1:D1”).Value = Array(“Date”, “Product”, “Quantity”, “Price”)
ws.Range(“A2:A11”).Value = Array(“2023-07-01”, “2023-07-02”, “2023-07-02”, “2023-07-03”, “2023-07-04”, “2023-07-05”, “2023-07-05”, “2023-07-06”, “2023-07-07”, “2023-07-07”)
ws.Range(“B2:B11”).Value = Array(“Product A”, “Product B”, “Product A”, “Product C”, “Product A”, “Product B”, “Product C”, “Product A”, “Product B”, “Product C”)
ws.Range(“C2:C11”).Value = Array(5, 3, 2, 4, 6, 1, 2, 3, 7, 5)
ws.Range(“D2:D11”).Value = Array(10.5, 8.75, 10.5, 12, 10.5, 8.75, 12, 10.5, 8.75, 12)
ws.Range(“B1″).Validation.Add Type:=xlValidateList, AlertStyle:=xlValidAlertStop, Operator:=xlBetween, Formula1:=”Product A,Product B,Product C”
ws.Range(“B1”).Value = “Product A”
End Sub
-
Macro to Highlight Duplicates:
Using this code you can highlight duplicates as per your dataset.
Sub HighlightDuplicates()
‘ Step 1: Define worksheet
Dim ws As Worksheet
Set ws = ThisWorkbook.Worksheets(“DataSheet”)
‘ Step 2: Highlight duplicates in column A
ws.Range(“A1:A4”).FormatConditions.AddUniqueValues
ws.Range(“A1:A4”).FormatConditions(ws.Range(“A1:A4”).FormatConditions.Count).SetFirstPriority
ws.Range(“A1:A4”).FormatConditions(1).DupeUnique = xlDuplicate
ws.Range(“A1:A4”).FormatConditions(1).Interior.Color = RGB(255, 0, 0)
End Sub
-
Macro to Send Email:
- VBA macro that uses the provided code to send an email using Microsoft Outlook. Please make sure you have Outlook installed and configured on your system before running this code.
Sub SendEmail()
‘ Step 1: Create and define the Outlook Application
Dim outlookApp As Object
Set outlookApp = CreateObject(“Outlook.Application”)
‘ Step 2: Create and define the Outlook MailItem
Dim outlookMail As Object
Set outlookMail = outlookApp.CreateItem(0)
‘ Step 3: Compose the email
With outlookMail
.To = “[email protected]”
.Subject = “Test Email”
.Body = “This is a test email sent from Excel.”
.Send
End With
‘ Step 4: Release objects from memory
Set outlookMail = Nothing
Set outlookApp = Nothing
End Sub
-
Unprotect sheet:
This code you can use to unprotect sheet which you protect with password.
Sub UnprotectWorksheet()
ActiveSheet.Unprotect Password:=”mypassword”
End Sub
-
Range to Image Conversion:
- This code is made to take a specified range of Excel worksheet cells and turn them into an image that will be automatically put into the same worksheet.
Sub PasteAsPicture()
Application.CutCopyMode = False
Selection.Copy
ActiveSheet.Pictures.Paste.Select
End Sub
-
Text to Speech:
- This code will speak all the text what you have in that range, cell by cell.
Sub Speak()
Selection.Speak
End Sub
-
Convert to Upper Case:
This code will convert selected range to upper case
Sub convertUpperCase()
Dim Rng As Range
For Each Rng In Selection
If Application.WorksheetFunction.IsText(Rng) Then
Rng.Value = UCase(Rng)
End If
Next
End Sub
-
Remove Decimals from Numbers:
This code will remove all the decimals from the numbers from the selected range.
Sub removeDecimals()
Dim lnumber As Double
Dim lResult As Long
Dim rng As Range
For Each rng In Selection
rng.Value = Int(rng)
rng.NumberFormat = “0”
Next rng
End Sub
-
Highlight Unique Values:
This code will highlight unique values from selected range.
Sub highlightUniqueValues()
Dim rng As Range
Set rng = Selection
rng.FormatConditions.Delete
Dim uv As UniqueValues
Set uv = rng.FormatConditions.AddUniqueValues
uv.DupeUnique = xlUnique
uv.Interior.Color = vbGreen
End Sub
-
Highlight All Cells With Comments:
This code will highlight all the cells that have comments in it.
‘This code will highlight cells that selected comments`
Sub HighlightCellsWithComments()
ActiveSheet.Cells.SpecialCells(xlCellTypeComments).Interior.Color = vbGreen
End Sub
-
Highlight alternative rows in the selected range
This code will highlight alternative rows in the selected range.
‘This code would highlight alternate rows in the selection range.
Sub HighlightAlternateRows()
Dim Myrange As Range
Dim Myrow As Range
Set Myrange = Selection
For Each Myrow In Myrange.Rows
If Myrow.Row Mod 2 = 1 Then
Myrow.Interior.Color = vbCyan
End If
Next Myrow
End Sub
-
Open Calculator
Using this code, you can launch a specific calculator from within Excel.
Sub OpenCalculator()
Application.ActivateMicrosoftApp Index:=0
End Sub
-
Highlight Top 10 Values
This code will highlight top 10 values with the color.
Sub TopTen()
Selection.FormatConditions.AddTop10
Selection.FormatConditions(Selection.FormatConditions.Count).S
tFirstPriority
With Selection.FormatConditions(1)
.TopBottom = xlTop10Top
.Rank = 10
.Percent = False
End With
With Selection.FormatConditions(1).Font
.Color = -16752384
.TintAndShade = 0
End With
With Selection.FormatConditions(1).Interior
.PatternColorIndex = xlAutomatic
.Color = 13561798
.TintAndShade = 0
End With
Selection.FormatConditions(1).StopIfTrue = False
End Sub
-
Daily Task Reminder:
This code will send team members daily work reminders automatically.
Sample dataset:
|
Task |
Assignee |
Due Date |
|
Task 1 |
John Smith |
30-07-2023 |
|
Task 2 |
Emily Johnson |
31-07-2023 |
|
Task 3 |
Michael Brown |
01-08-2023 |
Sub DailyTaskReminder()
Dim ws As Worksheet
Set ws = ThisWorkbook.Worksheets(“Tasks”)
Dim lastRow As Long
lastRow = ws.Cells(ws.Rows.Count, “A”).End(xlUp).Row
Dim todayDate As Date
todayDate = Date
Dim i As Long
For i = 2 To lastRow
If ws.Cells(i, “C”).Value = todayDate Then
Dim assignee As String
assignee = ws.Cells(i, “B”).Value
Dim task As String
task = ws.Cells(i, “A”).Value
Dim reminderMsg As String
reminderMsg = “Reminder: Task ‘” & task & “‘ is due today.”
‘ Code to send email or notification to the assignee here
‘ Replace this with your actual code for sending reminders
End If
Next i
End Sub
-
Sales Forecasting:
This code will use macros to forecast daily sales based on historical data.
Sample dataset:
|
Date |
Sales |
|
01-07-2023 |
1000 |
|
02-07-2023 |
1200 |
|
03-07-2023 |
800 |
Sub SalesForecasting()
Dim ws As Worksheet
Set ws = ThisWorkbook.Worksheets(“SalesData”)
Dim lastRow As Long
lastRow = ws.Cells(ws.Rows.Count, “A”).End(xlUp).Row
Dim salesSum As Double
Dim i As Long
For i = 2 To lastRow
salesSum = salesSum + ws.Cells(i, “B”).Value
Next i
Dim averageSales As Double
averageSales = salesSum / (lastRow – 1)
‘ Code to display or store the average sales value here
‘ Replace this with your actual code for further analysis
End Sub
-
Expense Report Generation:
This code will create macros to generate daily expense reports for employees.
Sample Dataset:
|
Date |
Employee |
Amount |
|
01-07-2023 |
John Smith |
50 |
|
02-07-2023 |
Emily Johnson |
70 |
|
03-07-2023 |
Michael Brown |
45 |
Sub ExpenseReportGeneration()
Dim ws As Worksheet
Set ws = ThisWorkbook.Worksheets(“Expenses”)
Dim lastRow As Long
lastRow = ws.Cells(ws.Rows.Count, “A”).End(xlUp).Row
Dim totalExpense As Double
Dim i As Long
For i = 2 To lastRow
totalExpense = totalExpense + ws.Cells(i, “C”).Value
Next i
‘ Code to display or store the total expense value here
‘ Replace this with your actual code for generating the report
End Sub
-
Data Entry Automation
Automate the data entry process for daily transactions.
Sample dataset
|
Date |
Description |
Amount |
|
01-07-2023 |
Sale |
500 |
|
02-07-2023 |
Expense |
100 |
|
03-07-2023 |
Purchase | 300 |
Sub DataEntryAutomation()
Dim ws As Worksheet
Set ws = ThisWorkbook.Worksheets(“Transactions”)
‘ Code to automate the data entry process here
‘ Replace this with your actual code for data entry
End Sub
-
Customer Feedback Analysis
This code will use macros to analyze daily customer feedback and generate reports.
Sample dataset
|
Date |
Customer |
Feedback |
|
01-07-2023 |
John Smith |
Good |
|
02-07-2023 |
Emily Johnson |
Excellent |
|
03-07-2023 |
Michael Brown |
Average |
Sub CustomerFeedbackAnalysis()
Dim ws As Worksheet
Set ws = ThisWorkbook.Worksheets(“Feedback”)
Dim lastRow As Long
lastRow = ws.Cells(ws.Rows.Count, “A”).End(xlUp).Row
Dim goodFeedbackCount As Long
Dim excellentFeedbackCount As Long
Dim averageFeedbackCount As Long
Dim i As Lon
For i = 2 To lastRow
Select Case ws.Cells(i, “C”).Value
Case “Good”
goodFeedbackCount = goodFeedbackCount + 1
Case “Excellent”
excellentFeedbackCount = excellentFeedbackCount + 1
Case “Average”
averageFeedbackCount = averageFeedbackCount + 1
End Select
Next i
‘ Code to display or store the feedback analysis here
‘ Replace this with your actual code for generating reports
End Sub
Conclusion
Excel macros, powered by VBA, provide an incredible way to automate tasks, save time, and extend the functionality of Microsoft Excel. With the ability to write custom code, users can easily tailor Excel to suit their specific needs and tackle complex data processing challenges. Whether you are a beginner or an experienced user, learning VBA and mastering the art of Excel macros can significantly boost your productivity and proficiency with this widely-used spreadsheet software.